Cette page sera traduite
en Français bientot!
La fabrication d'une clé
Voici une méthode pour fabriquer des clés pour hautbois et/ou des régulateurs de cornemuses.
|
 |
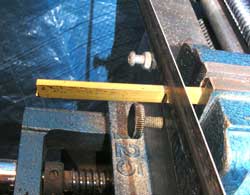
Cut bars to size
With a metal hacksaw, cut the brass bars to the length that you will need. This is easier to do if the brass is clamped in a vise. |
 |
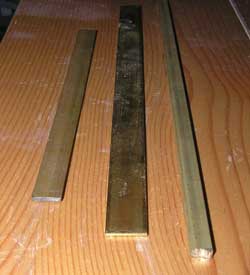
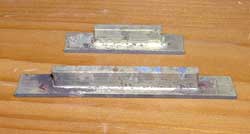
Key blanks
Pictured are blanks for making 2 different keys. The wider flat bars are for the upper "touch" part of the keys where the finger presses down during play, and the narrow bars are for the lower pivot piece where the axis pin will later be drilled. |
 |
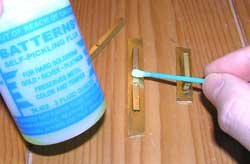
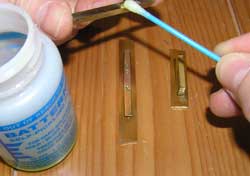
Cleaning the surfaces
Silver or "hard" soldering requires that all the pieces be perfectly flat and that the surfaces be extremely clean of any dust particles or finger grease. A good cleaning agent is acetone which can be applied using a Q-tip. The solder too, which is discussed in the next step, can also be cleaned in this way. |
 |
Silver solder
Silver solder comes in both wire and sheet form. Most people use wire because it is more accessible but I find that it is easier to work with sheet solder since it will allow you to be hands-free during the heating stage once you have done the necessary preparations. I recommend buying easy flow silver solder which requires less heat than medium or higher flow solders. Sheet solder can be found at most jewellers' supply shops. Cut the sheet with metal shears into strips matching the surfaces of your brass pieces. |
 |
Apply flux
Flux comes in various forms as well - liquid, paste or granules. Borax flux in paste form is very effective and the most common type used for soldering brass. I have been using Battern's liquid flux successfully so it is another option. Apply the flux generously to all surfaces that will be soldered together. Without flux, the solder will not react to the brass and your pieces won't adhere. |
 |
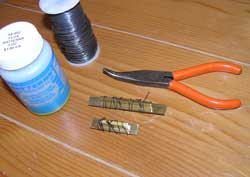
The brass, solder, flux sandwich
Follow these steps to begin making your "sandwich". Place the touch piece on your table, apply flux. Place the solder strip on the touch piece and apply flux on top of the solder. Then, place the pivot piece on top of the solder. You should have a shim sandwich with brass, flux, solder, flux, brass. If you're thinking of food at this point, go make yourself a real sandwich. Don't forget the mayo! |
 |
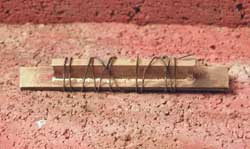
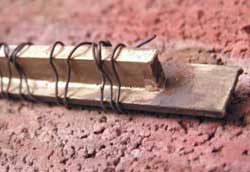
Secure the pieces together
Using iron wire, which is also available at jewellers' supply shops, tie all the pieces together by wrapping the wire around the key assembly. Tighten everything using small pliers. You must use iron wire because it will not solder itself to the other metals when you heat it all up. |
 |
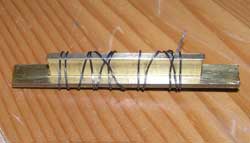
Ready for cooking
Your key should now look something like this. Make sure that the solder strip hasn't shifted while you were tying the wire and use only the pliers to straighten things out. If you use your fingers you run the risk of contaminating the surfaces. |
 |
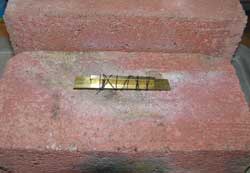
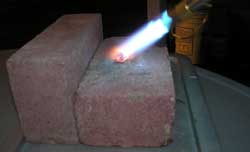
Heating surface
Place your key assembly on a suitable surface with the pivot piece facing up. I found a couple of bricks in the neighborhood which work great. |
 |
Apply heat
Unlike with plumbing, silver or hard soldering requires higher temperatures and regular propane torches don't generate enough heat. In Canada, you can find MAPP gas which comes in a yellow canister and is available at regular hardware shops or home improvement stores. You will need an appropriate nozzle for the MAPP gas's extra heat. |
 |
Heat until the solder flows
It is imperative that you heat your key assembly from all angles by moving the torch around so that the heat is distributed evenly. The brass will start to glow red and you will start to see the solder melt/flow from under the brass. When the solder has flowed on all of the mating surfaces remove the heat and, using your pliers to pick up the key, place it under cold water. |
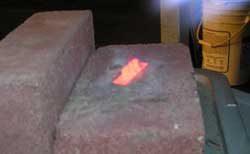 |
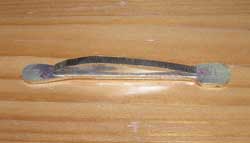
Soldering is complete
Your key should now be one solid piece. It will look a little burnt at this stage but the discoloration will go away at a later stage. If you over cook the brass it can cause some scaling so always try to heat it just enough for the solder to flow and no more. |
 |
Close-up
In this close-up, you can see that the solder has flowed fairly evenly along the length of the mating area. |
 |
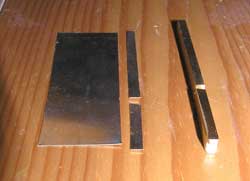
Finished key blanks
With your pliers, remove the iron wire and rinse off any residue left over by the heating process. Your key blanks are now ready for shaping. |
 |
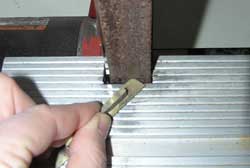
Grinding
This is the least enjoyable part of the key making process because of the metal dust and the noise. I strongly recommend using a dust mask, ear plugs and safety goggles while grinding the brass to shape. Having metal dust build up in your lungs is not a good thing! My friend Rob uses a metal band saw to rough shape his keys but that scares the bejeezus out of me. I'd rather sit through the grind. I use a belt sander because I don't own a conventional bench grinder. Either tool will get the job done. |
 |
Rough shape
I like to get my key to about this shape and I proceed to finishing the finer profile using hand files. Filing is more efficient if the key is clamped in a vise but I often just hold the key in my hand since I like to do this on a park bench or at the beach. |
 |
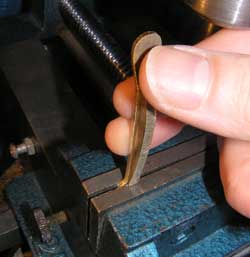
Bend the key tip
The key tip where the pad will be situated will likely need to be angled a little. Again, I do this on the vise. Be careful not to over bend. Needless to say, if you bend the brass back and forth a few too many times it will cause metal fatigue and the tip will break right off. |
 |
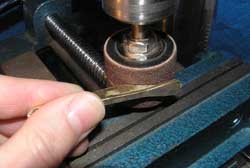
Shape the tail end
I use a sanding drum attached to my drill press to shape the underside of the key where the spring will be situated. The drum's profile leaves a nice, rounded profile. Just a quick word on sanding and grinding brass, it will get very hot quickly so keep some cold water nearby both for the metal and for your fingertips. |
 |
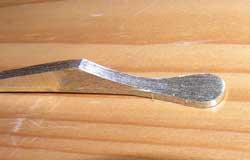
Close-up of the touch area
|
 |
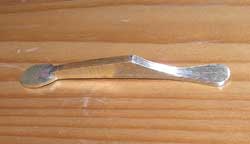
Ready for the spring
At this stage, I leave the key with only minimal filing left to do. The drilling of the pivot and rivet holes will leave a burr, the hammering down of the rivet may leave some minor impressions in the metal, and the pad hasn't yet been fitted, all of which give me reason to leave a little extra material left to file down before the key is given its final shape. |
 |
| |
à continuer... |