Bending Tubes
Before any bending can take place, you will first need to make yourself a proper bending tool. The commercially available ones, as shown here, are rarely suitable for making bagpipes because the diameter of the die is too large, resulting in an excessively wide bend. Furthermore, they are ill-conceived for handling 180º bends. |
|
Homemade Tube-Bending Tool
This bender is very easy to make and it gives great results. I use it primarily for making bass drone bends for uilleann pipes. |
|
Making your own Tool
While any hardwood will do the trick, I used Hard Maple for mine. The steel hardware consists of common nuts, bolts and brackets, all readily available at most hardware stores. The handle is a steel tube with a tight-fitting hardwood dowel inserted along the inside for reinforcement. The grooves are routed out on a drill press using a half-round bit and the die is shaped entirely on the lathe. |
|
Bending Alloys
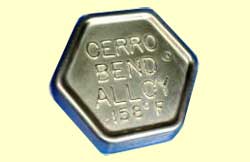
Pouring a temporary filler into the tube is indispensable for realizing a clean bend. Without it, a tube will buckle or flatten under the stresses imposed by the bending process. Cerrobend is the alloy of choice, consisting of bismuth, lead, tin and cadmium. It comes in linget form and melts at a low 158ºF. |
 |
Other Materials Needed
Your brass tubes should already be cut to size and annealed to render them more malleable. Fill an old pot or double-boiler with water. You will not be able to reuse the pot for cooking food once you have melted the alloy because of its lead content so don't use your favorite cooking ware. Find an implement with a spout, such as an elongated ladle. This will help when pouring the alloy into the narrow mouth of the tubes. |
|
Step 1
Start by plugging one end of each tube with cork or any other suitable material. Pour some vegetable or olive oil into the open end and spread it around such that the oil coats the inside walls of the tubes. This will prevent the alloy from clinging onto the brass when it is time to remove it. Pour out any excess oil. |
|
Step 2
Bring the water to a boil, then turn off the heat and drop the Cerrobend alloy into the pot. You should not allow the Cerrobend to boil as this can potentially release fumes and compromise the alloy's purities. |
|
Step 3
The alloy will slowly melt and become liquid. I usually stir it around with the implement to help remove any clumping.
Unfortunately, the next step requires two hands and I was unable to hold the camera up while performing this task. The explanation should be self-explanitory, however.
|
|
Step 4
Hold the tube upright at a 20-30º angle with a set of non-marring pliers. Pour the Cerrobend into the tube and give it a quick tap with your forefinger to remove any air pockets that may have formed on the inside. It doesn't matter if water gets poured in with the alloy since the Cerrobend is heavy and it will force the water to the surface. Remove the tubing from the pot and cool it down under cold water. It is important for the alloy to cool rapidly in order for it to crystallize uniformly. You should end up with something that looks like this. |
|
Step 5
Place the filled tube in the bender and make the bend in one single flowing motion if possible. If you stop midway, you run a higher risk of leaving an uneven bend. This is more of a cosmetic issue but it is best avoided nonetheless. |
|
Step 6
Remove the bent tube from the tool and place it back into the hot water. |
|
Wait for the alloy to melt
completely!
It takes longer for the center of the tube to become liquid so be sure to allow the filler to clear out completely before removing the tube from the water.
|
|
Step 7
Remove the tubes and run water through them under the tap to clear out any left over bits of alloy that may have gotten lodged inside. Needless to say, try to prevent any bits from falling down into the drain or you will create a deposit of metal bits inside your plumbing. |
|
A Successful Bend
The end result should look like this. I usually blow into the tube enthusiastically to encourage any bits of stubborn alloy to break free.
|
|
Set of Five bends
I always make extra bends in case one of them turns out to be uneven. Finally, the tubes are polished prior to being installed onto the set of bagpipes. |
|
Sample 1
Upper Bass Drone Bends on a set of Uilleann pipes. |
|
Sample 2
Lower Bass Drone Bend
on
the same set of pipes |
|